Deploy CSI drivers for Dell PowerScale storage solutions
Dell PowerScale is a flexible and secure scale-out NAS (network attached storage) solution designed to simplify storage requirements for AI and HPC workloads. To enable the PowerScale storage solution on the Kubernetes clusters, Omnia installs the Dell CSI PowerScale driver (version 2.13.0) on the nodes using helm charts. Once the PowerScale CSI driver is installed, the PowerScale nodes can be connected to the Kubernetes clusters for storage requirements. To know more about the CSI PowerScale driver, click here.
Note
Omnia doesn’t configure any PowerScale device via OneFS (operating system for PowerScale). Omnia configures the deployed Kubernetes cluster to interact with the PowerScale storage.
PowerScale SmartConnect [Optional]
To utilize the PowerScale SmartConnect hostname, it is necessary for the user to have an upstream DNS server that includes delegation mappings of hostname to PowerScale IP addresses. During the provisioning of cluster nodes, users can specify the IP of the upstream
DNSserver in theinput/network_spec.ymlfile. This ensures that the Omnia cluster recognizes and is aware of the upstream DNS server, enabling the use of PowerScale SmartConnect hostname functionality. For example:--- Networks: - admin_network: nic_name: <network name> netmask_bits: "16" static_range: <static ip range> dynamic_range: <dynamic ip range> correlation_to_admin: true admin_uncorrelated_node_start_ip: "" network_gateway: "" DNS: <upstream DNS server> MTU: "1500"
If the user did not specify the upstream DNS server during the provisioning process and wishes to utilize PowerScale SmartConnect afterwards, then the user must first add the upstream DNS server IP to the
DNSentry ininput/network_spec.ymland then re-run thediscovery-provision.ymlplaybook.
Prerequisites
Download the
secret.yamlfile template from this link.Update the following parameters in the
secret.yamlfile as per your cluster details and keep the rest as default values. For example:clusterName: <desired cluster name>
username: <username>
password: <password>
endpoint: <endpoint_IP>
Note
If PowerScale SmartConnect hostname is configured, user can provide the PowerScale hostname for
endpoint. Otherwise user can provide PowerScale IP address as well.endpointPort: <endpoint_port>
isDefault: true
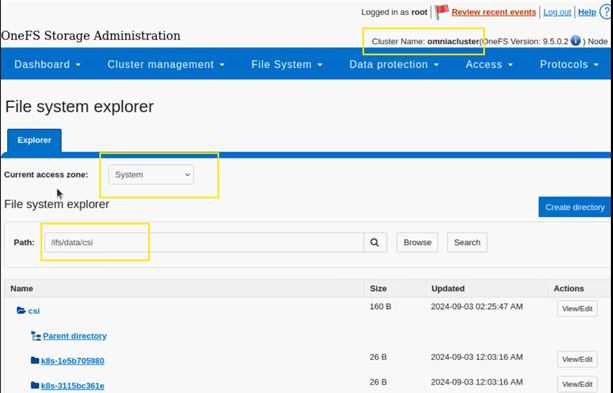
isiPath: “/ifs/data/csi”
Reference values from OneFS portal:
Download the
values.yamlfiles template using the following command:wget https://raw.githubusercontent.com/dell/helm-charts/csi-isilon-2.13.0/charts/csi-isilon/values.yaml
Update the following parameters in the
values.yamlfile and keep the rest as default values. Refer the below sample values:controllerCount: 1
replication:
enabled: false
snapshot:
enabled: true
resizer:
enabled: false
healthMonitor:
enabled: false
endpointPort:8080
skipCertificateValidation: true
isiAccessZone: System
isiPath: /ifs/data/csi
Enable
auth_basicfor the PowerScale devices: Omnia authenticates and connects with PowerScale devices using basic authentication. To check and enable basic authentication from PowerScale’s end, do the following:Establish an SSH connection with the PowerScale node.
Execute the following command:
cat /usr/local/apache2/conf/webui_httpd.conf | grep -A 20 "# Platform API"
Check the response and see if
IsiAuthTypeBasic Offis displayed. If yes, it means that basic auth is not enabled from PowerScale. Use the following command to activate it:isi_gconfig -t web-config auth_basic=true
Note
In order to integrate PowerScale solution to the deployed Kubernetes cluster, Omnia requires the following fixed parameter values in values.yaml file:
controllerCount: 1
Replication: false
Snapshot: true
skipCertificateValidation: true
Note
Once the PowerScale CSI driver has been deployed, the parameters in the values.yaml can’t be changed. If the user wants to modify the values.yaml file, they must first uninstall the PowerScale CSI driver from the cluster and then re-install with the updated parameters.
Installation Process
Once
secret.yamlandvalues.yamlis filled up with the necessary details, copy both files to any directory on the OIM. For example,/tmp/secret.yamland/tmp/values.yaml.Add the
csi_driver_powerscaleentry along with the driver version to theomnia/input/software_config.jsonfile:{"name": "csi_driver_powerscale", "version":"v2.13.0"}
Note
By default, the
csi_driver_powerscaleentry is not present in theinput/software_config.json.
Execute the
local_repo.ymlplaybook to download the required artifacts to the OIM:cd local_repo ansible-playbook local_repo.yml
Add the filepath of the
secret.yamlandvalues.yamlfile to thecsi_powerscale_driver_secret_file_pathandcsi_powerscale_driver_values_file_pathvariables respectively, present in theomnia/input/omnia_config.ymlfile.Execute the
omnia.ymlplaybook to install the PowerScale CSI driver:cd omnia ansible-playbook omnia.yml -i <inventory_filepath>
Note
There isn’t a separate playbook to run for PowerScale CSI driver installation. Running
omnia.ymlwith necessary inputs installs the driver. If Kubernetes is already deployed on the cluster, users can also run thescheduler.ymlplaybook to install the PowerScale CSI driver.After running
omnia.ymlplaybook, thesecret.yamlfile will be encrypted. User can use below command to decrypt and edit it if required:cd omnia ansible-vault edit <secret.yaml filepath> --vault-password-file scheduler/roles/k8s_csi_powerscale_plugin/files/.csi_powerscale_secret_vault
Caution
Do not delete the vault key file .csi_powerscale_secret_vault, otherwise users will not be able to decrypt the secret.yaml file anymore.
Expected Results
After the successful execution of the
omnia.ymlplaybook, the PowerScale CSI driver is deployed in the isilon namespace.Along with PowerScale driver installation a storage class named ps01 is also created. The details of the storage class are as follows:
apiVersion: storage.k8s.io/v1
kind: StorageClass
metadata:
  name: ps01
provisioner: csi-isilon.dellemc.com
reclaimPolicy: Delete
allowVolumeExpansion: true
volumeBindingMode: Immediate
parameters:
  AccessZone: < access zone mentioned in values.yaml file >
  Isipath: < isipath mentioned in values.yaml file >
  RootClientEnabled: "true"
  csi.storage.k8s.io/fstype: "nfs"
If there are errors during CSI driver installation, the whole
omnia.ymlplaybook execution does not stop or fail. It pauses for 30 seconds with CSI driver installation failure error message and then proceeds with rest of the playbook execution.For an unsuccessful driver installation scenario, the user first needs to follow the manual removal steps mentioned below from the
kube_control_plane, and then re-run theomnia.ymlplaybook for CSI driver installation.
Post installation
[Optional] Create custom storage class
If user wants to create a custom storage class, they can do so by following the sample storage class template.
Sample storageclass template:
apiVersion: storage.k8s.io/v1
kind: StorageClass
metadata :
  name: <storage class name>
provisioner: csi-isilon.dellemc.com
reclaimPolicy: Delete
allowVolumeExpansion: true
volumeBindingMode: Immediate
parameters :
  clusterName: <powerscale cluster name > #optional
  AccessZone: System
  AzServiceIP: <PowerScale SmartConnect hostname or PowerScale IP> #optional
  Isipath: <isipath configured in powerscale > #sample: /ifs/data/csi/
  RootClientEnabled: "true"
  csi.storage.k8s.io/fstype: "nfs"
Note
If PowerScale SmartConnect hostname is configured and the delegated host list is set up in the external DNS server, then the user can provide the PowerScale hostname for
AzServiceIP. Otherwise user can provide PowerScale IP address as well.If there are any changes to the storage class parameters in a PowerScale cluster, the user must update the existing storage class or create a new one as needed.
Apply storage class
Use the following command to apply the storageclass:
kubectl apply -f <storageclass name>
Create Persistent Volume Claim (PVC)
Once the storage class is created, the same can be used to create PVC.
Sample deployment with PVC:
apiVersion: v1
kind: PersistentVolumeClaim
metadata:
  name: pvc-powerscale
spec:
  accessModes:
    - ReadWriteMany
  resources:
    requests:
      storage: 1Gi
  storageClassName: ps01
---
apiVersion: apps/v1
kind: Deployment
metadata:
  name: deploy-busybox-01
spec:
  strategy:
    type: Recreate
  replicas: 1
  selector:
    matchLabels:
      app: deploy-busybox-01
  template:
    metadata:
      labels:
        app: deploy-busybox-01
    spec:
      containers:
        - name: busybox
          image: registry.k8s.io/busybox
          command: ["sh", "-c"]
          args: ["while true; do touch /data/datafile; rm -f /data/datafile; done"]
          volumeMounts:
            - name: data
              mountPath: /data
          env:
            - name: http_proxy
              value: "http://<OIM IP>:3128"
            - name: https_proxy
              value: "http://<OIM IP>:3128"
      volumes:
        - name: data
          persistentVolumeClaim:
            claimName: pvc-powerscale
Apply the deployment manifest along with PVC
Use the following command to apply the manifest:
kubectl apply -f <manifest_filepath>
Expected Result:
Once the above manifest is applied, a PVC is created under name
pvc-powerscaleand is inBoundstatus. Use thekubectl get pvc -Acommand to bring up the PVC information. For example:root@node001:/opt/omnia/csi-driver-powerscale/csi-powerscale/dell-csi-helm-installer# kubectl get pvc -A NAMESPACE NAME STATUS VOLUME CAPACITY ACCESS MODES STORAGECLASS VOLUMEATTRIBUTESCLASS AGE default pvc-powerscale Bound k8s-b00f77b817 1Gi RWX ps01 <unset> 27h
User can also verify the same information from the OneFS portal. In the sample image below, it is mapped with the
VOLUMEentry from the above example:k8s-b00f77b817:

Removal
To remove the PowerScale driver manually, do the following:
Login to the
kube_control_plane.Execute the following command to switch to the
dell-csi-helm-installerdirectory:cd /opt/omnia/csi-driver-powerscale/csi-powerscale/dell-csi-helm-installer
Once you’re inside the
dell-csi-helm-installerdirectory, use the following command to trigger thecsi-uninstallscript:./csi-uninstall.sh --namespace isilon
After running the previous command, the PowerScale driver is removed. But, the secret and the created PVC are not removed. If users want to remove them, they need to do it manually from the “isilon” namespace.
If users don’t want to use PowerScale anymore, they can remove the following as well:
Remove the PowerScale secret by executing the following commands one after the other:
kubectl delete secret isilon-creds -n isilonkubectl delete secret isilon-certs-0 -n isilon
Remove any custom user deployment and PVC that was using PowerScale storage class.
Remove the PowerScale storage class.
Note
In case OneFS portal credential changes, users need to perform following steps to update the changes to the secret.yaml manually:
Update the
secret.yamlfile with the changed credentials.Login and copy the
secret.yamlfile to thekube_control_plane.Delete the existing secret by executing the following command:
kubectl delete secret isilon-creds -n isilon
Create the new secret from the updated
secret.yamlfile by executing the following command:kubectl create secret generic isilon-creds -n isilon --from-file=config=<updated secret.yaml filepath>
If you have any feedback about Omnia documentation, please reach out at omnia.readme@dell.com.